
The Parts of a Sewing Machine Worksheet introduces learners to the intricate world of sewing, providing a detailed exploration of the essential components that make up a sewing machine. This guide delves into the functions, importance, and interplay of each part, empowering aspiring seamstresses and tailors with a comprehensive understanding of their indispensable tool.
As we embark on this educational journey, we will uncover the secrets behind the sewing machine’s remarkable ability to transform fabric into wearable art and functional creations. From the humble beginnings of threading the machine to mastering advanced techniques, this worksheet serves as a valuable resource for both novice and experienced sewers alike.
Parts of a Sewing Machine

A sewing machine is a mechanical device that uses a needle to sew fabric and other materials together with thread. Sewing machines are used in homes, businesses, and industries to create a wide variety of products, including clothing, accessories, and home furnishings.
The basic parts of a sewing machine include the following:
- The needleis a thin, pointed piece of metal that pierces the fabric and carries the thread through it.
- The bobbinis a small spool of thread that is wound around a spindle and placed in the bobbin case.
- The bobbin caseis a housing that holds the bobbin and guides the thread to the needle.
- The presser footis a metal foot that holds the fabric in place while it is being sewn.
- The feed dogsare small, metal teeth that move the fabric through the machine.
- The tension discsare two discs that control the tension of the thread.
- The handwheelis a large wheel that is used to turn the machine.
- The foot pedalis a pedal that is used to control the speed of the machine.
These parts work together to create a stitch, which is a series of loops of thread that hold the fabric together. The type of stitch that is created depends on the settings of the machine.
Sewing machines are versatile tools that can be used to create a wide variety of projects. With a little practice, anyone can learn to use a sewing machine to create beautiful and functional items.
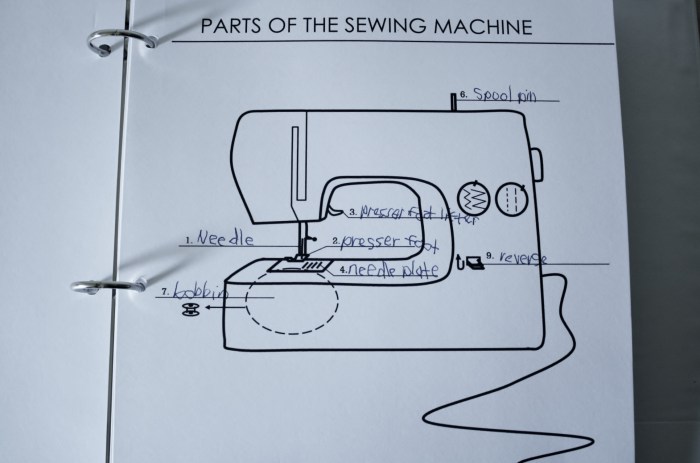
Diagram of a Sewing Machine
The following diagram shows the different parts of a sewing machine:
[Insert diagram of a sewing machine here]
Each part of the sewing machine is labeled on the diagram.
Importance of Each Part
Each part of the sewing machine plays an important role in the sewing process. The needle pierces the fabric and carries the thread through it. The bobbin holds the thread that is used to create the stitch. The bobbin case guides the thread to the needle.
The presser foot holds the fabric in place while it is being sewn. The feed dogs move the fabric through the machine. The tension discs control the tension of the thread. The handwheel is used to turn the machine. The foot pedal is used to control the speed of the machine.
All of these parts work together to create a stitch that holds the fabric together. Without any one of these parts, the sewing machine would not be able to function properly.
Types of Sewing Machines
Sewing machines are classified into various types based on their features, capabilities, and level of automation. Each type offers unique advantages and disadvantages, catering to specific sewing needs and skill levels.
Mechanical Sewing Machines
- Advantages:Simple to operate, durable, affordable, easy to maintain.
- Disadvantages:Limited stitch options, manual thread tension adjustment, slower speed.
- Examples:Singer 4423, Brother XM2701.
Electronic Sewing Machines
- Advantages:Wider stitch variety, automatic thread tension, faster speed, digital display.
- Disadvantages:More expensive than mechanical machines, may require specialized maintenance.
- Examples:Janome 2212, Husqvarna Viking Emerald 118.
Computerized Sewing Machines, Parts of a sewing machine worksheet
- Advantages:Extensive stitch library, computerized controls, touch screen interface, pattern memory.
- Disadvantages:Most expensive type, complex to operate, requires technical knowledge.
- Examples:Pfaff Creative Icon, Bernina B 790.
Basic Sewing Techniques

Mastering the basics of sewing is essential for beginners to build a solid foundation and improve their skills. This section covers fundamental techniques, including threading the machine, winding the bobbin, and sewing a straight stitch, with step-by-step instructions and practical tips.
Threading the Machine
Threading the sewing machine correctly is crucial for proper stitch formation. Follow these steps:
- Raise the presser foot and insert the thread into the thread guide.
- Pass the thread through the tension discs and the needle.
- Pull the thread through the needle bar thread guide.
- Lower the presser foot and test the tension by gently pulling the thread.
Winding the Bobbin
Winding the bobbin with the correct amount of thread is essential for smooth sewing. Follow these steps:
- Insert the empty bobbin onto the bobbin winder.
- Pass the thread through the thread guide on the bobbin winder.
- Start the machine and wind the bobbin until it is full.
- Cut the thread and remove the bobbin from the winder.
Sewing a Straight Stitch
Sewing a straight stitch is the most basic sewing technique. Follow these steps:
- Place the fabric under the presser foot and lower it.
- Start the machine and slowly guide the fabric through the machine.
- Hold the fabric taut to ensure even stitches.
- Stop the machine and cut the thread when you reach the end of the seam.
Troubleshooting Common Sewing Problems

Every sewist encounters sewing problems at some point. Knowing how to troubleshoot and fix these issues can save time and frustration. This guide provides an overview of common sewing problems, their causes, and solutions.
Common sewing problems can be grouped into three main categories: thread breakage, skipped stitches, and fabric puckering. Each problem has its own set of causes and solutions.
Thread Breakage
- Causes:
- Using the wrong thread for the fabric
- Thread tension is too tight
- Needle is damaged or bent
- Bobbin is wound incorrectly
- Solutions:
- Use the correct thread weight and type for the fabric.
- Adjust the thread tension according to the fabric and thread.
- Replace the needle if it is damaged or bent.
- Rewind the bobbin correctly.
Sewing Projects for Beginners
Embarking on a sewing journey can be daunting, especially for beginners. To ease into this creative endeavor, we present a curated collection of beginner-friendly sewing projects, designed to build confidence and nurture your sewing skills. These projects encompass practical items like tote bags and pillowcases, as well as simple garments that showcase the versatility of a sewing machine.
Each project is meticulously detailed with step-by-step instructions, patterns, and a comprehensive materials list. To further enhance the learning experience, we incorporate images or videos that visually illustrate the techniques involved. Whether you’re a complete novice or seeking to refine your existing skills, these projects provide a solid foundation for your sewing adventures.
Tote Bag
A tote bag is an essential accessory that combines functionality and style. It’s perfect for carrying everyday items, groceries, or even as a beach bag. This project introduces basic sewing techniques such as straight stitching, hemming, and adding handles.
- Materials: Fabric (1 yard), thread, scissors, measuring tape, fabric marker
- Instructions: Cut two rectangular pieces of fabric (18″ x 12″). Fold the top edge of each piece by 1″ and press. Stitch the hem in place. Place the two pieces right sides together and stitch around the sides and bottom, leaving a 4″ opening for turning.
Turn the bag right side out and press. Topstitch around the top edge for a finished look.
Pillowcase
A pillowcase adds a personal touch to your bedroom decor while protecting your pillows from dust and stains. This project focuses on envelope-style pillowcases, which are easy to make and require minimal sewing skills.
- Materials: Fabric (1/2 yard), thread, scissors, measuring tape, fabric marker
- Instructions: Cut two rectangular pieces of fabric (20″ x 30″). Fold one of the short ends of each piece by 1″ and press. Stitch the hem in place. Place the two pieces right sides together and stitch around the sides, leaving a 6″ opening on one side for inserting the pillow.
Simple Garment
For those ready to take their sewing skills to the next level, a simple garment project is an excellent choice. A basic t-shirt or skirt can be customized to your style and measurements.
- Materials: Fabric (1 yard), thread, scissors, measuring tape, fabric marker, sewing machine with a variety of stitches
- Instructions: Choose a pattern for a beginner-friendly garment, such as a t-shirt or skirt. Cut out the pattern pieces and follow the instructions to assemble the garment. Use a variety of stitches, such as straight stitch, zigzag stitch, and overlock stitch, to create a professional-looking finish.
Advanced Sewing Techniques
Advanced sewing techniques expand the possibilities of sewing, allowing you to create garments and accessories with greater precision, creativity, and sophistication. These techniques include utilizing specialized stitches, mastering gathering methods, and expertly sewing curves.
Utilizing Specialized Stitches
Specialized stitches, such as blind hems, decorative stitches, and stretch stitches, enhance the functionality and aesthetics of your sewing projects. Blind hems provide an invisible finish, while decorative stitches add unique embellishments. Stretch stitches are designed to accommodate stretchy fabrics, preventing puckering and ensuring a comfortable fit.
Mastering Gathering Methods
Gathering techniques add volume and texture to fabrics, creating ruffles, pleats, and shirring. The two main gathering methods are hand-gathering and machine-gathering. Hand-gathering provides greater control and precision, while machine-gathering is faster and more efficient.
Expertly Sewing Curves
Sewing curves requires precision and skill to achieve smooth and even results. Techniques such as pivoting, easing, and clipping curves help prevent puckering and ensure a professional finish. Pivoting involves rotating the fabric while sewing to create sharp curves. Easing involves stretching the fabric slightly to accommodate curves.
Clipping curves involves making small snips into the seam allowance to reduce bulk and allow the fabric to curve more easily.
Questions and Answers: Parts Of A Sewing Machine Worksheet
What are the main parts of a sewing machine?
The main parts of a sewing machine include the needle, bobbin, presser foot, tension dial, and stitch selector.
How do I thread a sewing machine?
To thread a sewing machine, follow these steps: 1) Raise the needle to its highest position. 2) Open the bobbin cover and insert the bobbin. 3) Draw the thread from the bobbin and through the thread guide. 4) Thread the needle from front to back.
What is the purpose of the presser foot?
The presser foot holds the fabric in place while sewing and helps to create an even stitch.
